Stack layers, TLM builds the nodes.
Stack paint, fill, procedural, adjustment, reference and group layers — each has an Output that routes it to the channel you pick, and TLM builds the Principled BSDF graph for you.
See the layer types →Texture Layer Manager adds a real layer stack to the Blender material editor. Each layer routes to the PBR channels you choose; the addon compiles the stack into a normal Principled BSDF graph behind the scenes — and converts it to fully editable nodes whenever you want.
Blender 5.x · Full in Cycles, most materials in EEVEE Next · one-time purchase · converts to standard Blender nodes
What it does
Stack paint, fill, procedural, adjustment, reference and group layers — each has an Output that routes it to the channel you pick, and TLM builds the Principled BSDF graph for you.
See the layer types →One button turns the stack into an editable node graph — the .blend keeps rendering even without the addon.
AO, curvature, edge-wear, Fresnel, light angle, procedurals — no baking.
Unreal · Unity · glTF, with channel packing.
Results
Four of the included presets, rendered in Cycles exactly as they load. Each is an editable layer stack — open it and change any layer. Some presets ship extra detail or variant layers switched off — toggle them in the stack.
5 layers · real geometric displacement.
14 layers · emission + transmission.
6 layers · flat NPR shading.
12 layers · fully procedural terrain.
Stack → result
The five layers exactly as they sit in the panel — a fill base, two noises, Voronoi cells and micro grain, each with its own blend mode and opacity — and the material they produce. No nodes edited by hand.
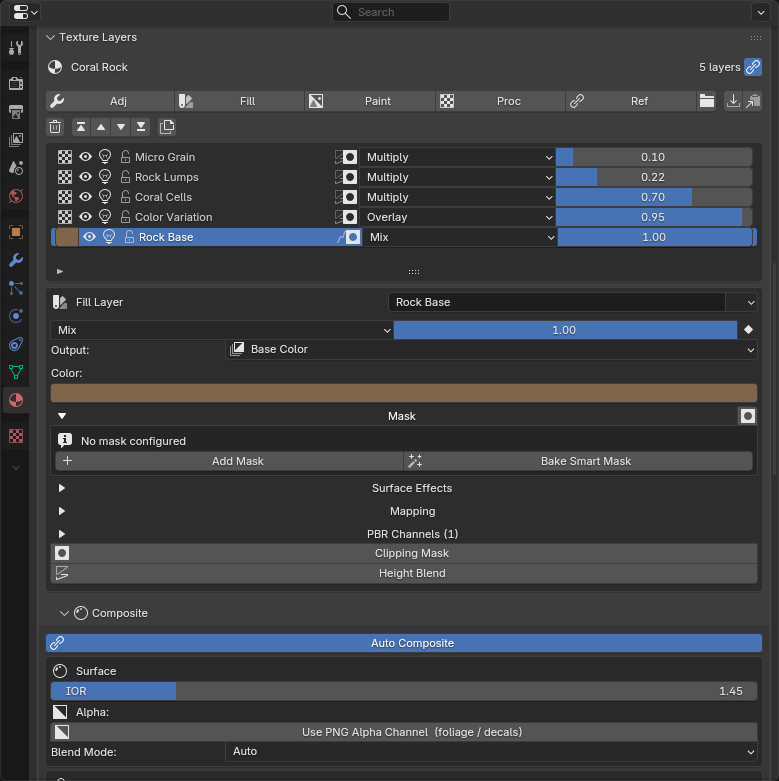
The layer stack in the TLM panel.
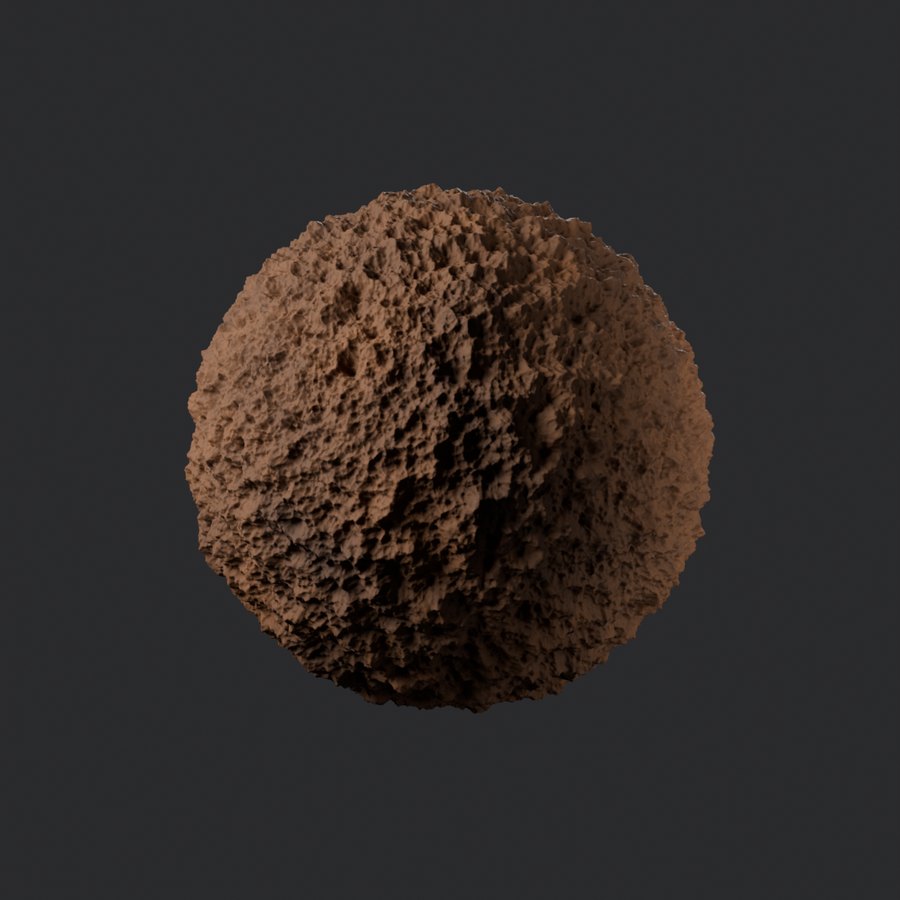
The same material, rendered in Cycles.
No lock-in
TLM is a faster way to author a material, not a container that traps it. The layers are compiled into an ordinary Principled BSDF node graph, and one button converts that graph into fully editable nodes you can hand-tune, extend, or ship without the addon installed.
Stack and reorder layers, change blend modes, masks, PBR routing and opacity without opening the shader editor. Fast to iterate while the look is still moving, and readable months later because layers have names instead of being a wall of nodes.
.tlm presetsConvert the stack to a normal Blender shader and the result is just nodes: inspect them, add your own, hand-tune values, append the material into another file, or keep working with no dependency on the TLM UI.
Layer types
Adjustment, fill, paint, procedural and reference — click a tab to see what each does and when you’d reach for it. (Group layers fold any of them into a collapsible folder.)
Five non-destructive operations — Hue/Saturation, Brightness/Contrast, Levels, Color Balance and Gradient Map — applied non-destructively to everything beneath. It can target any PBR channel, not just colour.
Reach for it when: you want to warm a whole stack, knock back an over-bright preset, or grade only the roughness without repainting anything.
Adjustment layer in detail →A solid colour plus roughness and metallic values, all editable at any time — no painting, no image. One fill can drive several channels at once (e.g. base colour + roughness + metallic together).
Reach for it when: you need the base “primer” layer almost every material starts from, or a clean tint to grade everything above.
Fill layer in detail →A paintable layer backed by its own image texture at the resolution you choose (512–4096), with full alpha and per-layer blend modes. Because it’s an image, it follows the model’s UVs.
Reach for it when: you need something in a specific place — a logo, a decal, hand-painted dirt or wear that has to sit exactly where you put it.
Paint layer in detail →24 patterns — Noise, Voronoi, Wave, Marble, Musgrave, Gradient, Brick, Hex, Wood, Tiles, Weave, Cracks, Caustics and more — each parametric (scale, detail, distortion, colour ramp, coordinate transforms). They generate in 3D space, so they wrap a model with no UV unwrap required. UV is available as an optional coordinate mode when you want the pattern to follow existing UVs.
Reach for it when: you want resolution-independent surfaces — stone, fabric, panels, organic noise — without spending texture memory or unwrapping.
Procedural layer in detail →A reference layer borrows another layer’s pattern as its source, then applies its own blend mode, opacity, mask and channel routing. Build a wear mask once and drive base colour, metallic, roughness and bump from it independently — a reusable smart-material driver, without baking.
Reach for it when: one chip mask should simultaneously expose bare metal, raise roughness and add relief. Edit the source once; everything that references it follows.
Reference layer in detail →Output
A layer isn’t locked to “colour”. Its Output picks the single channel the layer drives — Base Color, Roughness, Metallic, Emission, Transmission or Alpha. Change the Output and the same layer changes job: move a painted decal from Base Color to Alpha and it stops colouring and starts cutting holes.
Output is just the first routing decision — one layer can also drive several channels at the same time. That’s the PBR Channels panel, next. ↓
PBR Channels
The Output sends a layer to one channel. Open its PBR Channels panel and you can switch on more — each with its own image or value, its own blend mode and mask. They stack on top of the Output, so a single layer behaves like a complete little material on its own.
So one Fill can set Base Color, Metallic and Roughness together; one procedural can colour the surface, add relief on Bump and a glow on Emission — all without adding another layer. Output is where the layer routes first; PBR Channels is how it feeds many BSDF inputs at the same time.
Compositing
Each layer has opacity and a blend mode: Multiply grime into crevices, Screen a glow, Overlay detail without washing out what’s beneath. The difference here is that a layer can use a different blend mode on each PBR channel.
Masking
A mask is a 0–1 factor that decides where a layer shows. In TLM every layer can carry one, built from a short pipeline you control: pick a source, optionally combine a second, refine the falloff, and it gates the layer. Most sources read the mesh or the view live — no baking.
What the mask reads from — a painted image, the mesh geometry, the view/light angle, or a procedural pattern.
Optional slot B blended with A — Multiply, Min, Max, Add, Subtract, Screen or Difference — each slot independently invertible.
Contrast, Levels (in / gamma / out), Softness and Blur — shape the mask edge without leaving the panel.
The final factor × the layer’s opacity decides exactly where the layer contributes.
Two ways to apply a mask: a layer mask gates one layer (white reveals, black conceals), or a clipping mask clips a layer to the one below. Image masks project Flat, Box (triplanar), Sphere or Tube.
Procedurals
Noise, Voronoi, Marble, Wave, Gabor, Cracks, Wood, Tiles, Weave and more — all parametric and resolution-independent. Change the type or any value and the viewport updates without rebuilding the node tree. They generate in 3D space, so no unwrap is required (UV is optional, for when you want the pattern to follow existing UVs).
Beyond the stack
Layers and channels are the core — but real surfaces also want depth, glass, projection control and finishing touches. They’re all in the box.
True geometric displacement, per-layer or material-level, with adaptive subdivision — not just a bump fake.
Material-level absorption and scatter for tinted glass, frosted interiors, fog and translucency.
The Scatter procedural drops cells at random so a surface never visibly tiles — gravel, freckles, stars.
… plus the controls that quietly do the finishing work:
Your own images
Drop in a photo, a logo or your own artwork as an image layer, then stack procedural and adjustment layers on top to transform it. One ships in the pack:
A view-dependent rainbow foil over your artwork: the bands scroll and shift hue as the card turns, like a real holo card. Five switchable foil patterns.
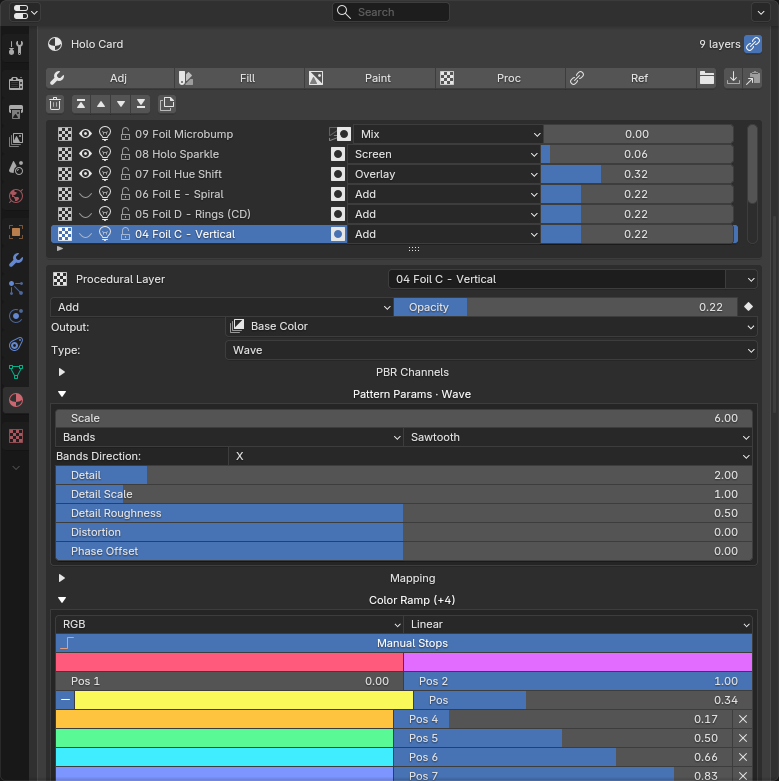
Card art at the bottom, five foil patterns above it — one visible, four switched off. The eye toggles swap the foil; the colour ramp below drives the rainbow.
Import & bake
.tlm preset filesIncluded presets
The pack ships 13 complete stacks — photoreal PBR, stylised NPR, image-driven effects and emissive sci-fi. Each is a real, editable layer stack you can use as a starting point or open up to see how it’s built. A sample:
NdotL shadow bands and a rim light — light-driven cel shading.
Cast bronze with green patina pooling in the cavities and polished high edges.
Black marble with swirling cosmic veins in violet and gold.
A wet black surface with petrol-rainbow swirls, masked by Fresnel.
FAQ
Do my materials still work without the addon?
Yes. A TLM stack can be converted into standard Blender nodes, so the final shader isn’t trapped in a proprietary container — the .blend keeps rendering normally even if the addon isn’t installed.
Do I have to UV unwrap?
Not for procedural or smart-mask layers — they work in 3D space with no unwrap. Paint and image layers use the model’s existing UVs, and procedurals offer UV as an optional coordinate mode.
Which Blender versions are supported?
Built and tested on Blender 5.x.
Does it render in EEVEE Next?
Cycles renders every material in full. EEVEE Next handles most stacks, with three known limits: heavy emissive stacks (layers routed to Emission) can exceed EEVEE’s shader-complexity limit and fall back to flat grey; real geometric displacement is Cycles-only — EEVEE shows it as bump; volume absorption and scatter render fully in Cycles only. The workaround is the same for all three: render in Cycles, or bake the material to textures — baked maps render identically in every engine.
Will it slow down my viewport?
Editing a value updates the existing nodes in place instead of rebuilding the whole tree, so dragging sliders stays responsive.
Does it export to game engines?
A one-click bake flattens the stack to a PBR set for Unreal, Unity or glTF, with channel packing for ORM-style maps.
Is it a subscription?
No — one-time purchase with free updates. No account, no login, no recurring fee, and it’s fine for commercial work.
A layer-based PBR workflow inside Blender — non-destructive, routable to 8 channels, bakeable for any engine, and convertible to standard nodes whenever you want.
Get TLM on Gumroad — $19.99One-time purchase · free updates · Blender 5.x